Wednesday, March 21, 2012

Nancy's March Layout Challenge


Hi Everyone...I am so excited to be part of this great team...I mean have you seen the other girl's work it's incredible!

From now on no excuses! I have to complete one challenge a month and blog about it...woohoo that is just what I needed. The challenges have always been one of my favorite things over at Auntie Em's it's so interesting to see how the same page map or technique can inspire us to create such different things.

As you can see I decided that the subject of my layout would be my favorite little person my niece (oh and I guess I can say God Daughter now too) Gabrielle. I babysat her for an entire weekend and sent my sister and brother in law on a weekend getaway. It was an awesome weekend and I wanted to create a layout for it. I am planning on using a multi photo insert to go with this layout that will include some journal blocks and more photos of the weekend.


The Paradise line from little yellow bicycle that Emma gave us to work with just happened to match perfectly the photos I wanted to use. BONUS!


So I started as I always almost do in photoshop. I always sharpen my images and check that the levels are ok. I printed the images from home on my Epson directly onto 4x6 paper. I left one of the images in full colour and manipulated the other image a bit.


To create that effect I duplicated the layer and made one layer sepia and toned it down to about 50% then brought back the colour in her cheeks a little; cause those rosy cheeks, are just too cute.

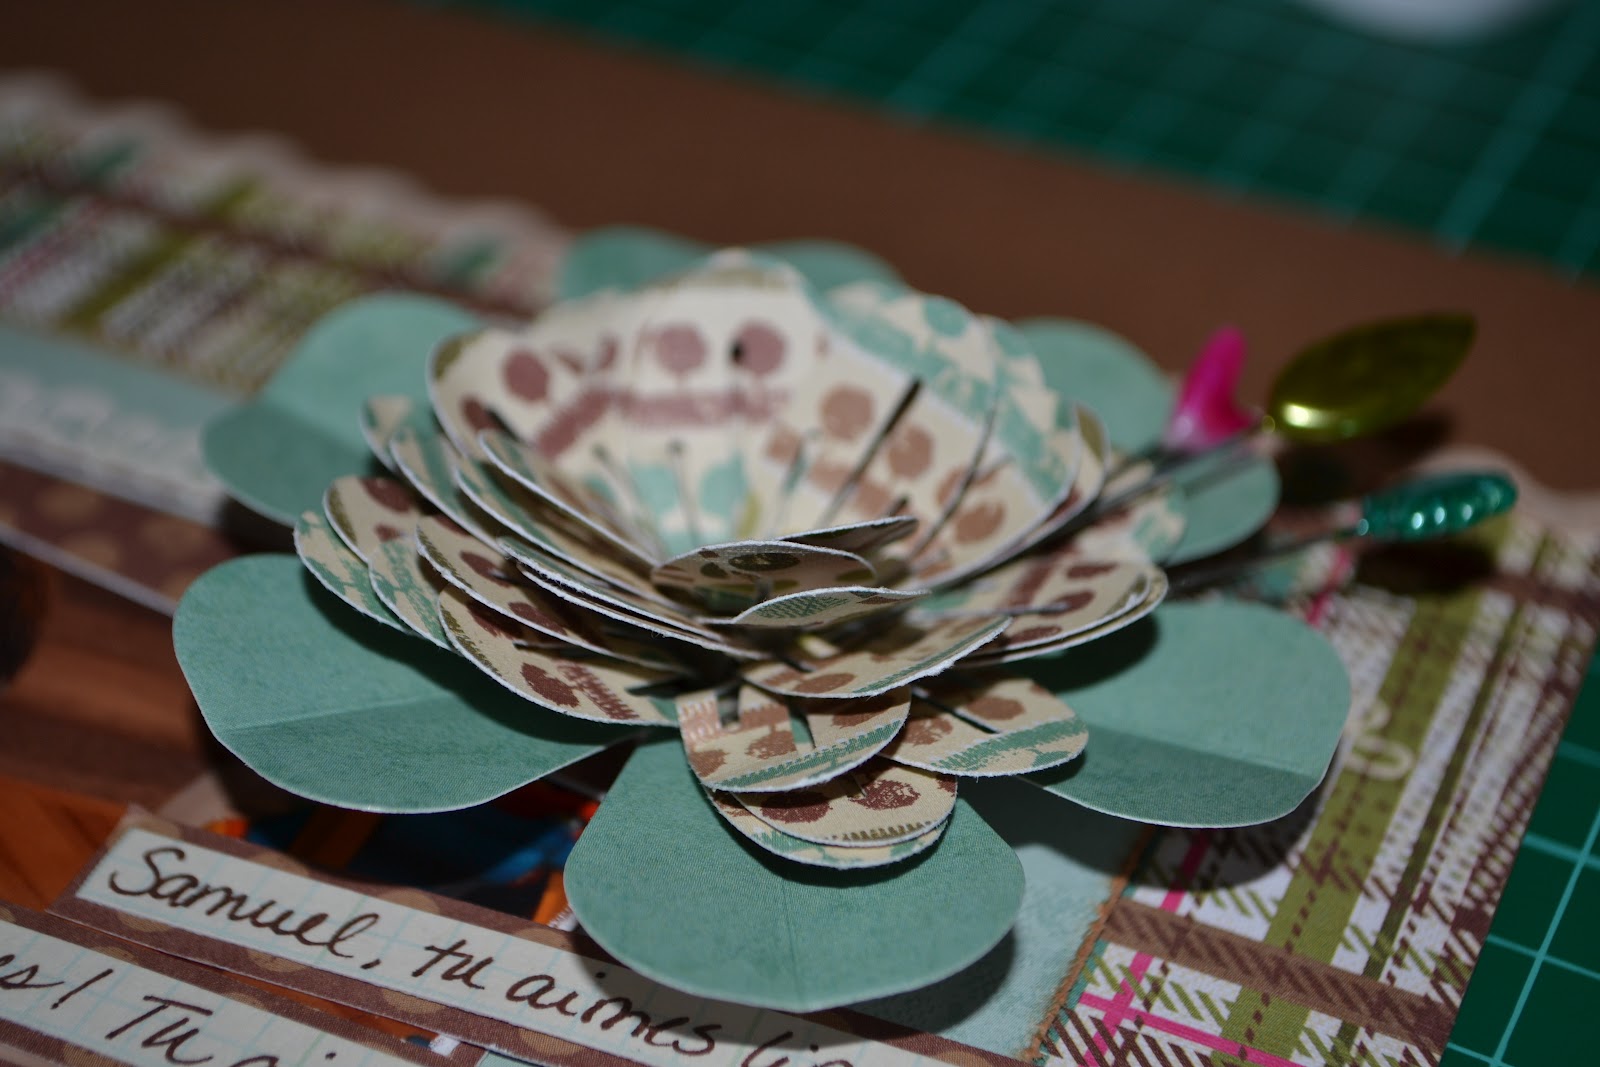
I cropped the images and was on my way. The layout turned out great but there were bumps along the road. I was trying to get the flower challenge just right and ended up leaving lots of glue on the bottom left so I adapted the layout and moved the title from the right to the left to cover up the mess.

As you can tell the graphic designer in me has a hard time letting go of the grid. My layouts are mostly straight and everything is aligned. I swear I try really hard to break that habit. For that reason I wanted my flower to be a little rough around the edges. I decide to create a flower out of ribbon since I have an unhealthy obsession with ribbon. Check out the photo tutorial below and the detailed shots of my layout.

I hope you all have a chance to create a layout for the March challenge it's a good motivator to getting things scrapbooked!

Wednesday, March 14, 2012

A Boy's Life

The secret's out: I'm a keener! In early February, at our first design team meeting, Emma gave us all one project that had to be done by the end of the month. I was done the next day!

When the design team met again at the end of February, Emma asked me if I wanted to do an extra project for March and I enthusiastically said yes! I left the store that day with two extra projects: a product review (which will be coming in early April) and this one.

I have a 3-year old boy named Sam. So when Emma gave me the paper for this project, I was very happy! The collection is A Boy's Life by Echo Park. I have to say up front that Echo Park is one my favourite scrapbooking companies. Their lines are perfect for scrapbookers who want to create layouts featuring their children.

I managed to make two layouts with the 5 papers I had from the line.

My Friend Caleb


This layout showcases pictures I took in December 2010 of Sam and his friend Caleb playing together. I used several techniques on this layout, including using the Sea Easy to add the faux stitching detail at the top and bottom of the page; using a border punch and Distress Ink in Broken China; using another border punch to add a horizontal border at the bottom on the page; using pop-up tape to add dimension; and sanding the edges of my main photo. You can see a close-up of these techniques below:

One of the things I love about the Echo Park collections are the accompanying sticker sheets. Usually, you get one alphabet sticker sheet and one with designs. I used both in this layout.

Alphabet sticker sheet:

I used a few border pieces from the other sticker sheet.

Nothing says that you have to use the stickers "as is". As shown in one of the pictures above, I took the orange zig zag border piece and cut it to use it as a mini-border on the side of two pictures. One of my complaints about stickers (of the non-chipboard variety at least) is that they lack dimension. To fix this, I used pop-up tape on some of the stickers. It allowed me to layer stickers, like I could have done with flowers:


Fun with Alfie

The second layout I created with this collection is one featuring Sam and our cat Alfie.

I used similar techniques to the last layout, but a few different ones, including: sanding the edges of the pictures; using stickers and using pop-up tape for some of them; ripping the edge of one of the papers and inking that edge; and using a border punch to create a border:

Notice that I used different alphabet stickers on this layout. With this collection, there were 3 different sets.

The technique that really worked out but doesn't show through on the pictures is the crackle paint on the die cut used to mat the journalling box (by the way, the journalling box was on the sticker sheet). I used Tim Holtz Distress Crackle Paint. I then used Distress Ink in Broken China and rubbed the ink on top of the crackle.


I'm so happy with these pages! It just goes to show that the combination of techniques and stickers can work well together.

Happy scrappin'!

Stephanie's March PageMaps Layout

Hey Everyone,

I was so excited when Emma told me that I was chosen as one of the Design Team members, but then reality set in... I would have to dust off my camera, I would need to create at least one page every month, and start writing in a blog!  And above all that, my layouts wouldn't just be stashed away in my album, but posted at Emma's for everyone to see. 

My first problem with this months challenge was that I didn't have any photos to use for my layout.  Most of my photos are of my son.  I had a couple of photos on my computer of myself but didn't have time to get them printed.  So I printed them on regular paper on my bubble jet.  Needless to say, the quality wasn't great so I had to find a way to work around it.  I glued the photos to circle chipboard with regular white craft glue and covered the photo as well to seal it, give it a shine and a little texture.

Next was the big challenge... make my own flower.  I tried different things, but nothing worked.  Finally, I took a circle chipboard and started gluing thread to make a flower design and added Stickles.  It's not great, but I was happy enough to keep it anyways.

I created the scalloped border using the Cricut with the George and Basic Shaped cartridge, and a little Stickles.  For my title, I used Chip Chatter Gellies.


Now it's your chance to use the March PageMaps calender sketch and make your own flowers - be sure to bring your submission to the store for your chance to win!


Stephanie

Monday, March 12, 2012

PRIMA MARKETING WITH CARI FENNELL!!!

I can't believe this is really happening! I'm so excited - I don't know what I love more Prima or Cari. Awesome product with an amazing educator. This is an event you won't want to miss. Come and celebrate National Scrapbooking Day and Auntie Em's Anniversary with wonderful classes featuring Prima's best products. The classes are filled with tons of techniques and products - even yummy leftovers to take home to create more!!

First up.....


FRIDAY, MAY 4th @ 6:00pm
PRIMA TAGS WITH CARI
Join Cari, to create an array of embellished tags, using Prima’s Songbird collection with lush flowers, rustic wood buttons, trim and more! This kit is loaded with a variety of embellishments to play with and each tag is individually designed with fabulous techniques. Plus, we will be altering a Prima tin to hold this gorgeous set of tags.
You will need your basic tool kit. The class kit is loaded with tons of products. The class cost is $40+HST.


SATURDAY, MAY 5TH @ 9:00am
Prima Sun Kiss Layouts with Cari
These layouts will have a warm sunshine feel, with playful images that can be used for a variety of themes and photos. We will create a layered effect on our backgrounds, using papers, chipboard elements and trim. Then we will embellish with a mixture of flowers that pull all our colors together for a unified look in the designs of the pages. Basic tool kit required. The class cost is $50+HST.


SATURDAY, MAY 5TH @ 1:30PM
Prima’s Artsy Almanac Album with Cari
Let’s put together a gorgeous album using resist canvas covers, unique inclusion pages and a variety of Prima’s gorgeous embellishments, to create a one of kind project!
We will use Prima’s new Mixed Media Journal covers with the new Almanac papers and a variety of art mediums to customize the books. The album is 12 pages from front to back cover. There will be stamping, spraying and inking throughout the class, so wear older clothes or bring an apron. Be prepared to get inky and have a blast!
Basic tool kit required. The class cost for this album is $70+HST.


Now, you see why I'm so excited!! Please note that due to logistics I must have some deadlines - As the saying goes a PAID spot is a SAVED spot!! To ensure we are prepared I ask that you please reserve and pay for your spot(s) by Saturday April 14th. Speaking of spots if you would like to attend all 3 irresistible classes you may take $10 off. Please call the store or better yet come by the store for more information. Hope to hear from you soon.

Wednesday, March 7, 2012

Sarah's First PageMaps Layout for the Design Team!

Earlier this month, I made the drive to Auntie Em's Scrapbooking for my first design team meeting. During my drive, I had plenty of time to daydream about what papers and embellishments Emma would give me to work with. Like any scrapbooker, I have my favourite companies. I was so excited to get my first project!


The supplies we were given were from a line called Paradise by Little Yellow Bicycle. I love Little Yellow Bicycle! When Emma showed us the line we would be using for this project, my mind instantly started working. I initially thought that the line was quite feminine. I have a 3-year old boy...what was I going to do with feminine paper?


Our instructions were to use the papers and embellishments and we had to use the March sketch from the 2012 PageMaps calendar as inspiration. Emma gave us an additional challenge: create your own flower.


Here is what I came up with:

I was happy that this paper was double-sided because...when you turned the seemingly feminine paper around, there was a more masculine side! With this knowledge, I felt that I could use pictures I took of my husband Matt and my son Sam reading a book together on the couch.


Full disclosure: I am a simple scrapbooker. I like clean layouts with a few embellishments but nothing incredibly fancy.


For this layout, I used all the supplies I received from Emma, except for the brads, the die cut shape used for the title background, the letter stickers, the ribbons, the ink and the floss (all from my personal stash). I like to start my layouts on a piece of cardstock, which is what I did here. I used Bazzill cardstock aka my favourite cardstock. Next, I glued down two of the patterned papers so that they covered most of the page. I decided that I needed to place my pictures on a more muted paper so I used the blue-ish paper given to me. I distressed the edge of the paper and used Tim Holtz Distress Ink in Tea Dye to ink it. I layered on top of the blue paper with the brown polka-dots paper. Next, I used We R Memory Keepers Sew Easy to sew on my page. Because I was sewing through a few layers of paper, it was a little more time consuming but worth to add some detail.


I then use a file to distress the edges of my pictures. This is one of my favourite techniques. It looks like your pictures are matted without having to do so. I glued them purposely crooked. I also used pop-up tape on the middle picture to add some dimension.


Next, I tackled making my own flower. I used EK Success carnation dimensional flower punch and punched out a 12" stretch of paper. I then rolled it around a pencil and glued it in place. I peeled back the petals and glued the blue flower (provided by Emma) underneath. The final touch was the pins from the line..and VOILĂ€!


I then moved on to the title. I felt that the title would get lost on the patterned paper. So, I used a die cut that I had in my stash and used the Tea Dye Distress Ink on the edges. I added letter stickers I also had in my stash. I looked at it and felt it needed a little something more. So, I added flowers and a leaf from the line (brads were from my stash).


The final touches: the ribbon at the top of the page; the white paper glued on the top of the brown polka-dot paper (I used a border punch to add pattern); and the journalling.


Here is a list of all the products I used (as far as I can remember!):
EK Success border punch
EK Success dimensional flower punch
Tea Dye Distress Ink
Sew Easy (We R Memory Keepers) floss, needle and stitch piercer
Beige ribbons
File
Edge distresser
Creative Memories letter stickers
Cooper brads
Brown cardstock
Brown pen
Pop-up tape


I can't wait to tackle next month's design team project!


Sunday, March 4, 2012

Stamp of the Month

Well this is actually February's Stamp of the Month - however due to weather we postponed it to this Wed. March 7th at 3:30pm PLEASE NOTE - the earlier time!  The sotm is a really cool ribbon border stamp - very versatile - you will get lots of use from it! The theme for this month is Easter/Spring both here before we know it!


Call the store at 613-938-4888 if you would like to join us Wed. afternoon or if you would like a kit put aside for you!

Saturday, March 3, 2012

Live with Prima!

I don't know if you all have had a chance to watch this video. It's a must see!! Cari Fennell of Prima is coming to Auntie Em's in May!  I would like to give you this opportunity to meet her and see the awesome creativity she oozes :)

As promised this morning at stampers swap for those of you not on facebook I promised to figure out a way for you all to see this recording. So here is hoping that I do this right. Here is the link to watch Cari - enjoy! http://www.ustream.tv/recorded/20765403

Stay tuned for more details on the Weekend with Prima featuring Cari Fennell. Keep May 4th and 5th open!

fingers crossed xx I'm hitting enter - let me know what you think!

Thursday, March 1, 2012

New Month - New Design Team - a PageMaps reveal

Welcome to March everyone!  We at Auntie Em's Scrapbooking and Beading are very proud to introduce to you our newest members of the Design Team.  Each week as a reminder we will be featuring a close up and in depth look at each Designer's layout - also this will serve as your inspiration to get your layout made for the challenge.Emma certainly challenged these girls right from the start with the Page Maps Calendar sketch.  A challenge to utilize the Little Yellow Bicycle collection - Paradise and to make their own flowers!


The girls really rose to the ocasion with the following layouts.


Sarah


Stephanie


Nancy


So - now it's your turn to create a layout using the March PageMap and remember your challenge is to make your own flower!  Drop your layout off at Auntie Em's for a chance to win a prize!
Welcome these lovely ladies by leaving a wonderful comment below.  You can see their amazing layouts in person at Auntie Em's.